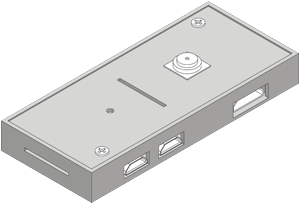
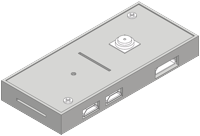
Simple compact case for Raspberry Pi Zero with integrated mini camera
This is a simple and compact case for the Raspberry Pi Zero that provides enough space to house an additional third party mini camera module.
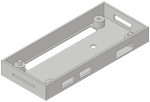
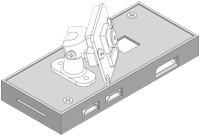
The bottom case has cutouts for the GPIO pins, the HDMI, the Micro SD and both Micro USB sockets. And there is enough space to solder onto the solder pads of the Pi Zero if you want to, for example to use the pads for power and USB data.
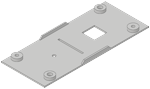
If you don't have one or don't want to use a third party mini camera module but a "full size" camera module, you can use the mounting hole in the lid to install an external camera module using my Hinge mount or ball and socket mount. There is a cutout in the side of the bottom case that can lead the camera cable to the outside. If you turn the lid by 180 degrees you can then guide the camera cable through the slot in the lid (but be careful not to kink it too much!).
The mounting hole in the bottom case can be used to install the case onto any suitable surface, and you can use the Hinge mount or ball and socket mount for this as well. Because the cutout for the GPIO pins is currently on the bottom of the case it has the drawback that you won't have good access to it if you directly mount it onto a surface without a gap inbetween. You don't have this problem if you use the hinge mount or the ball and socket mount. I am thinking about moving the cutout to the side to eliminate this. Let me know if you would prefer that.
The Pi Zero has to be inserted upside down!
A similar alternative casing for the Raspberry Pi Zero would be Case for Raspberry Pi Zero
Usage examples
Here are some examples how you could use the case.
Use it just as a case for your Raspberry Pi Zero ;-) With or without the third party mini camera module. Even though the Pi Zero is rather robust and I haven't yet managed to destroy one, it feels better to have it in a casing.
Use the Hinge mount or Ball and socket mount and their camera mount to attach a Raspberry Pi camera module ontop of this case.
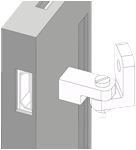
Use the Hinge mount or Ball and socket mount as flexible wall mount for this case. If you have placed a third party mini camera module inside the case, this is probably the easiest way to set the area the camera should look at.
3D printing
While designing my parts I always try to optimize their design and orientation in a way that won't need support structures while 3d printing them. Of course you can rotate the parts around the Z-axis prior to printing, but please don't do so on the X/Y-axis. A layer height of 0.2mm or 0.3mm is optimal. Because of the small size I print them all at 100% infill. There are some larger gaps at the side cutouts of the bottom case. My 3D printer prints them just fine, but if you are experiencing bridging problems you may have to insert support structures at this places using your slicer software.
Requirements
- A 3D printer to print the .stl files on this page
- A Raspberry Pi Zero
- A third party mini camera module
- One (preferable two) screws of ø2mm and about 8mm length to lock the lid.
- Optionally additional ø2mm screws if you want to use an external camera module or to mount the case on a surface.