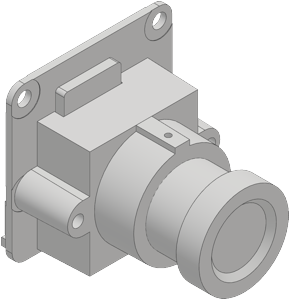
M12 mount installed onto Raspberry Pi camera module
If the field of view and focal length that the default lens of the Raspberry Pi camera module provides isn't sufficient for your project, you can either buy one of the third party camera modules that come with a factory installed M12 mount and lens or you can install a M12 mount on a camera module you already have. For the latter one you need a M12 mount and a M12 lens of your desired specification. Both can be bought fairly cheaply, for example at AliExpress or the like but watch out, you need one that covers the full 1/4" camera sensor. For the M12 mount look for a 20mm hole spacing (21mm would be perfect but nowhere to find) and that they preferable come with matching screws. Which M12 lens you chose is up to your requirements. You can buy them in a wide variety from fisheye and wide angle to narrow angle or even varifocal. I am no expert in this area but: the lower the focal length, the bigger the field of view.
Before you remove the original lens, do a dry-run. We want to avoid getting dust onto the sensor. Place the M12 mount on the camera module, while the old lens is still in place. You'll have to cutout a small tunnel on the bottom of the M12 mount because the little sensor connection cable is in the way. Mark the place and carefully cut it out with pliers, nail scissors or better suitable tools. Then put it on the camera module again and try to insert and tighten the screws. If the screws fit you're ready to go, otherwise you may have to slightly adjust the camera module. Don't worry, you only have to remove about 0.5mm of plastic towards the inside at both screw holes. A little scratching with nail scissors is all you need to do.
Now everything should fit and you can do the final installation. You should do the following steps quickly so no dust can get on the open sensor. Unscrew the little default lens in counter clockwise direction. We don’t have to remove the original lens mount, the risk of damaging the sensor below it is high and usually it isn't necessary at all. Now put the M12 mount on top and tighten the screws. Then screw the M12 lens into the mount and you are almost ready. The only thing left is to adjust the focus. Connect the camera module to a Raspberry Pi and to a monitor. Then start raspivid with its live preview and adjust the focus by screwing the lens in or out until the image is most clearly. Finally tighten the lock screw of the M12 mount to secure the lens position.
Of course this will work on the NoIR version too. While searching for a suitable M12 lens, keep in mind that some of them have a built-in IR cut filter. If you take one of those the NoIR camera module won't see IR light anymore and act like the normal version of the camera module.