IR cut filter with M12 mount installed onto Raspberry Pi camera module
At night, the missing IR cut filter of the NoIR Raspberry Pi camera module is beneficial, but at daytime the captured infrared light is, in most of my projects, a negative side effect that I want to avoid. There is an easy solution for this, a switchable IR cut filter. The one I use has an additional inbuilt M12 mount. The electronic part is easy, you only need a H-Bridge, 5V and GND, and two of your GPIO pins to control the state of the IR cut filter. If a time based switching is not enough for your project, you could even do it based on the day/night change if you add a light sensor.
Below I will describe the use case with a M12 lens, but it should also be possible to use this without a M12 lens. I haven't tried that yet. A larger spacer would be needed to satisfy the greater height of the original lens at its place. And you probably want to cover the M12 socket opening with optical glass to protect it from incoming dirt and insects.
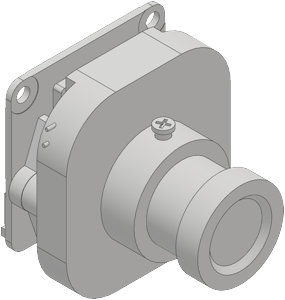
The installation is relatively simple. But before that you have to 3D print my spacer part. Later, we will remove the original lens but let the original lens mount at its place, because the risk of damaging the camera sensor is just too high and in most cases removing it is not necessary. Without the spacer the IR cut filter would not fit because of the height of the original lens mount. After you have printed it, do the following steps quickly, so no dust gets on the bare sensor. After you've done that, remove the little lens by turning it in counter clockwise direction. Now put the spacer in place and on top of that the IR cut filter with M12 mount. Then insert the screws from the backside and tighten them. Finally screw in the M12 lens.
The spacer. Place it between the IR cut filter mount and the camera module.
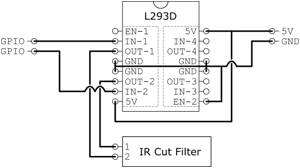
DownloadNext, you have to solder some wires on the H-Bridge and connect them with the IR cut filter and the Raspberry Pi that should control the cut filter. You can use the following drawing as an orientation. It is relatively simple.
After that, connect the camera module to the Raspberry Pi and a monitor and start raspivid with its live preview to adjust the focus by screwing the lens in or out until the image is most clearly. Finally tighten the lock screw of the M12 mount to secure the lens position.